Here at WeAreDevelopers, we’re always looking for ways to make our processes more efficient. If you’re an avid reader of this magazine then you might have seen our recent post about how we processed around 500 videos from the World Congress with just one PHP script, saving hundreds of hours of manual work.
Well, we’re back at it again, but this time we turned our focus towards our 150,000-strong newsletter. Recently, we noticed that while we could easily track new subscribers, tracking readers who had recently unsubscribed was less straightforward. Despite unsubscription being (of course!) relatively rare, tracking them would help us refine our content and make sure we’re providing content that resonates with our audience.
So, let’s get started with creating our own custom tracking system.
Step 1: Configure Google Sheets
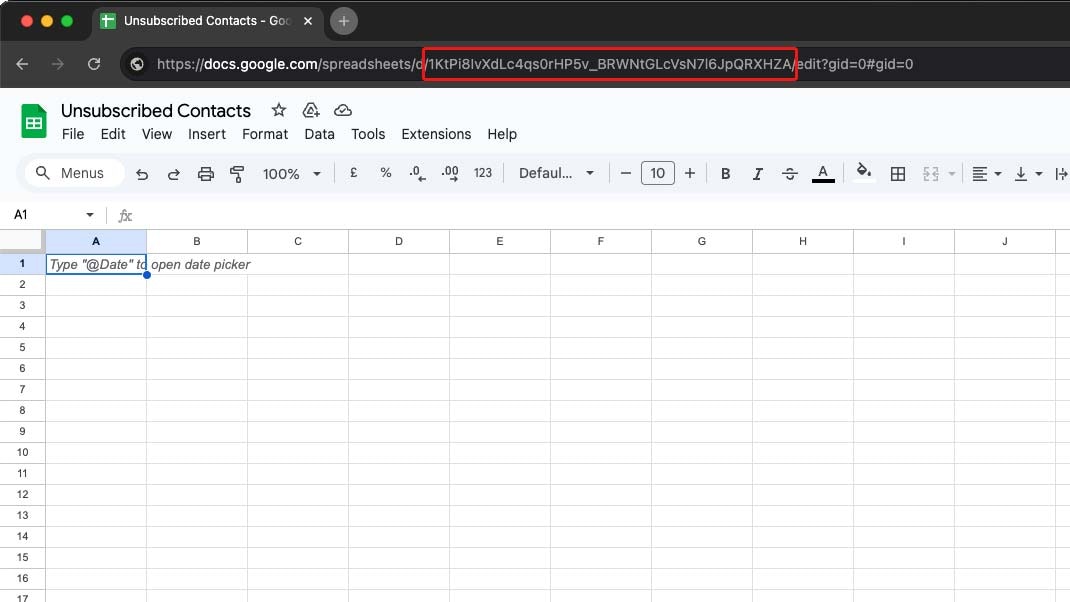
First off, let’s create a Google Sheet. We’re going to use this spreadsheet to store the email addresses of Unsubscribers, along with a timestamp. After heading to Google Sheets, create a new sheet named “Unsubscribed Contacts”, and share this sheet with the email address that receives notification emails when someone unsubscribes.
Next, take note of the sheet ID. This ID is a long string of characters in the URL after /d/ and before /edit, and you’ll need this a little later on.

Step 2: Create a Gmail Filter for Unsubscribe Notifications
Now that our spreadsheet is set up, we need to create a filter within our email inbox. This filter will allow us to capture notification emails, and label them as they arrive so we can find them with our script in the next step.

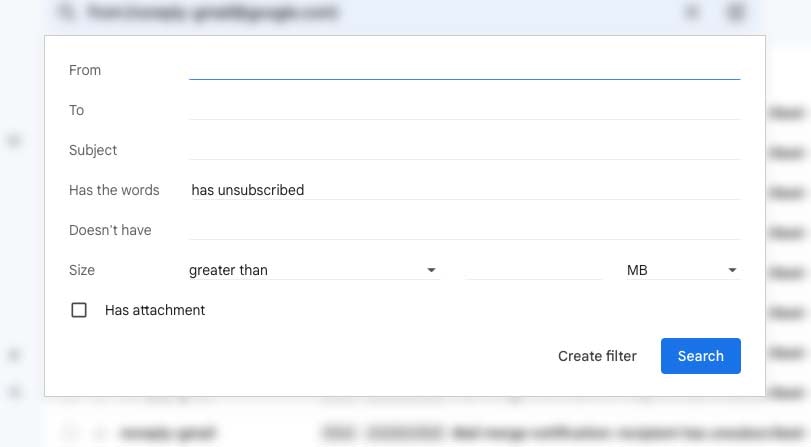
To create and apply the filter, select a notification email and click Filter messages like these. In the Has the words field, enter keywords like "has unsubscribed" (if this phrase is used in your notification emails). Click Create filter, and on the next step you can apply an existing or new label with Apply the label.
In our case, we apply the unsubscribed label, tagging any incoming unsubscribe requests so our script can detect and process them.
Step 3: Write the Google Apps Script to Log Unsubscribes
Now that the Gmail filter is in place and the Google Sheet is ready, it’s time to set up a Google Apps Script to automate the process.
With your Google Sheet open, go to Extensions > Apps Script or head to Google Apps Script, and create a new project.
In the editor, let’s start writing some code.
Fetch the label and threads
First up, create a function named logUnsubscribes. This function will be our main entry point, and we’ll start adding more to it in the next step:
Inside of this function, let’s fetch the Gmail label named “unsubscribed” using the GmailApp.getUserLabelByName function:
Once we have the label, we can retrieve the email threads associated with it using the getThreads() method:
At this stage, threads contains all email threads tagged with “unsubscribed” in your inbox.
Connect your spreadsheet
Now, let’s open the Google Sheet where we’ll log unsubscribed emails. We’ll use SpreadsheetApp.open along with the sheet ID that we took down earlier, passing this ID as an argument of the getFileById method.
This final line connects us to the Google Sheet where unsubscribed emails will be logged, but we need to do one more step to get it fully connected. After saving your project with the disk icon, press Run. Remember, our code is not complete, so ignore any errors in the execution log. However, you should now select Review permissions when the popup appears, and give the necessary permissions when prompted.
Process each thread
Now we’re going to start extracting information from the emails themselves, using a few methods built-in to App Script. Our unsubscription notification emails contain a string with the unsubscribers email, like so: “user@user.com has unsubscribed”.
To extract this information, let’s loop over each thread using a forEach loop and the getMessages() method.
Next, we’ll nest another forEach loop to loop over each of the messages in the thread, getting the body, and passing it to a extractEmail function that we’ll write in the next step:
Extract the email address
Let’s write a helper function to extract the email address from the email body, using a regular expression us to isolate the email address itself:
At this stage, we could simply add this email address to our Google Sheet with the appendRow method (shown below), but this could cause us some errors if we don't handle duplicates. So do this, we’re going to create one more helper function to check for duplicates so that we only create a new row if the email address is now already contained within our spreadsheet.
Check for duplicates
To check for duplicates, we’re going to create a helper called isAlreadyLogged():
Now let’s update our forEach loop, to append a new row if the email is not already featured on the spreadsheet. If it’s already there, it’ll skip this step (see Gist below to see this in action).
Removing the label to avoid future duplicates
Now we’ll do a quick clean up using the removeLabel method. This will clean up our inbox, removing the unsubscribed label from all threads once our script has finished running. Here's our completed code, and you'll notice the appendRow method only runs if the email is not already logged on the tracker, and the removeLabel cleanup code.
Step 4: Scheduling your Script
To ensure we’ve always got the most up to date data, let’s set our script to run once daily. Within Google App Script, go to Triggers using the sidebar.
Then, click Add Trigger, configuring it to run as often as you would like. Note that you can also choose how often or regularly you are notified if your script fails, which is useful considering the fact you will only see execution logs if you’re in the App Script interface itself, unless you set the notifications like this.
Summary
There we go, we’re finished! We’ve successfully set up an unsubscription tracking system, and the flow will go like so:
- A user unsubscribes, and we receive a notification email (containing the term “has unsubscribed”).
- Our inbox filter automatically adds the unsubscribed label to this email thread.
- Our script runs each day and finds all of the labeled threads.
- The labeled threads are processed, with the email address extracted from the body of each message with the extractEmail handler.
- The email is then added to our tracking spreadsheet (if it is not already on the list).
- Once our list has been processed, all labels are removed as part of our clean-up.
We hope you found this article helpful, and that it inspires you to have a go at creating your own scripts with Google App Script. We’d love to see what you can do with it, so be sure to follow us on socials to share it with our team.


